
SFTP is a secure shell protocol used to transfer files and directories between Linux and Windows servers. It is used by developers, website owners, financial services, and healthcare to exchange data between business clients. SFTP uses an SSH protocol for the secure transfer of files over the internet.
AWS Transfer Family is a fully managed AWS service that enables you to transfer files to and from Amazon S3 buckets. AWS Transfer Family uses SSH, SFTP, FTPS, and FTP protocol to transfer files over the internet.
Files.com is an extremely fast, reliable, and enterprise-ready file server solution that allows users to upload and share files. Files are encrypted and designed to work with all protocols. It can be integrated with different cloud providers including, Amazon S3, Dropbox, Google Drive, Microsoft Azure, SFTP, Microsoft One Drive, Sharepoint, Box, and many more to mount and sync files and directories.
Key Features for Files.com
- Compatible with almost all devices and is simple to use.
- Avails secure syncing and mounting will create any cloud or server for ease of storage of the data.
- Can connect with any app.
- Offers fast upload and download with a secure link.
- Especially for huge files (up to 5TB), Files.com proves to be highly ingenious.
Another option to get an SFTP server on AWS is to install file transfer management software on an EC2 account. One package that you could choose for this service is Cerberus FTP Server. This system also hosts a Web-based client, so you don’t have to install a file transfer app on every workstation. Instead, users access the Cerberus FTP client through a Web browser.
The benefits of the Cerberus system include constant activity logging and rogue transfer detection. This tool is suitable for businesses that need to comply with HIPAA, PCI DSS, SOX, and GDPR.
Key Features of Cerberus FTP Server:
- Provides FTP, SFTP, SCP, FTPS, and HTTPS methods
- Can set up automated transfers
- A Web-based client
- Group and virtual directories
- Integrates with Active Directory or other LDAP-based access rights managers
In this post, you will learn the following:
- Create an Amazon S3 bucket.
- Create an IAM Role for SFTP Users.
- Create SFTP Server on Amazon AWS.
- Access SFTP server from Linux.
- Integrate Files.com with Amazon SFTP Server and mount S3 bucket to Files.com.
- Install Cerberus FTP Server on an AWS EC2 account
Create an Amazon S3 bucket
In this section, we will create a bucket on Amazon S3.
Follow the below steps to create a bucket:
1. log in to the AWS console at https://console.aws.amazon.com/
2. Search for S3 in the search bar. You should see the following screen:
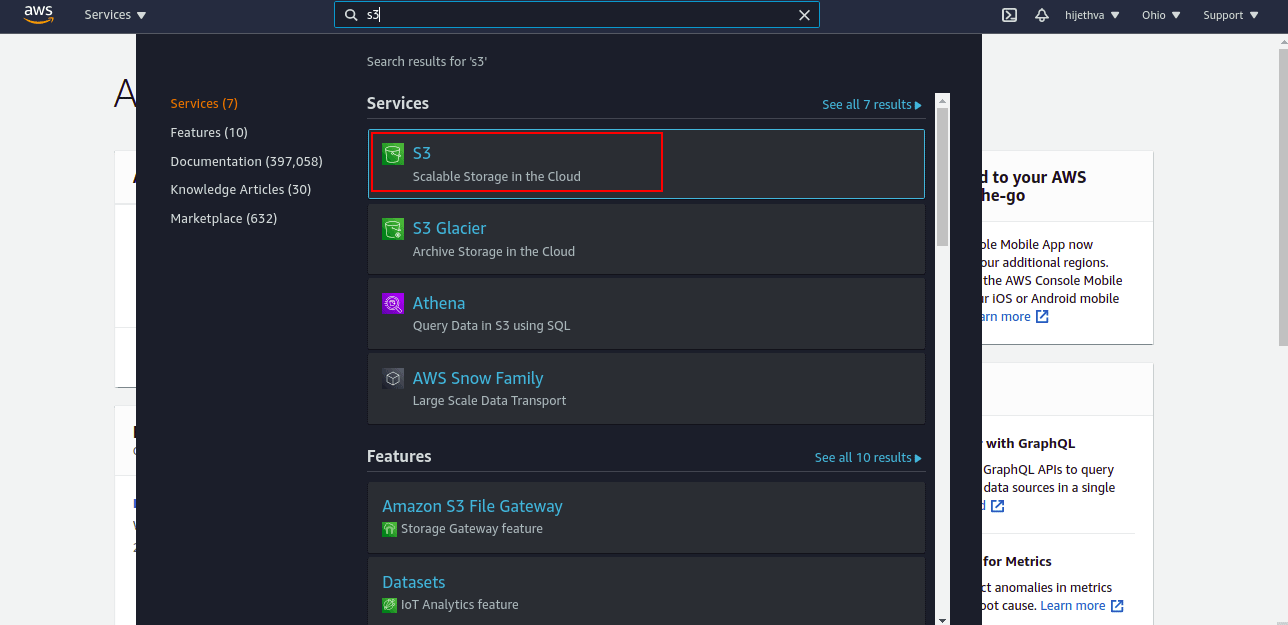
3. Click on S3. You should see the Amazon S3 dashboard on the next screen:
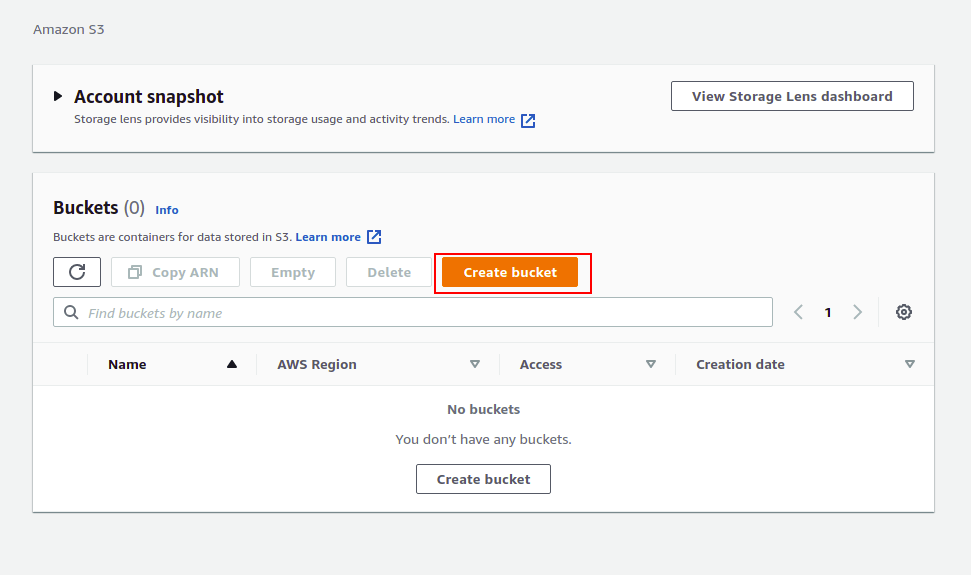
4. Click on the Create bucket button. You should see the next screen:
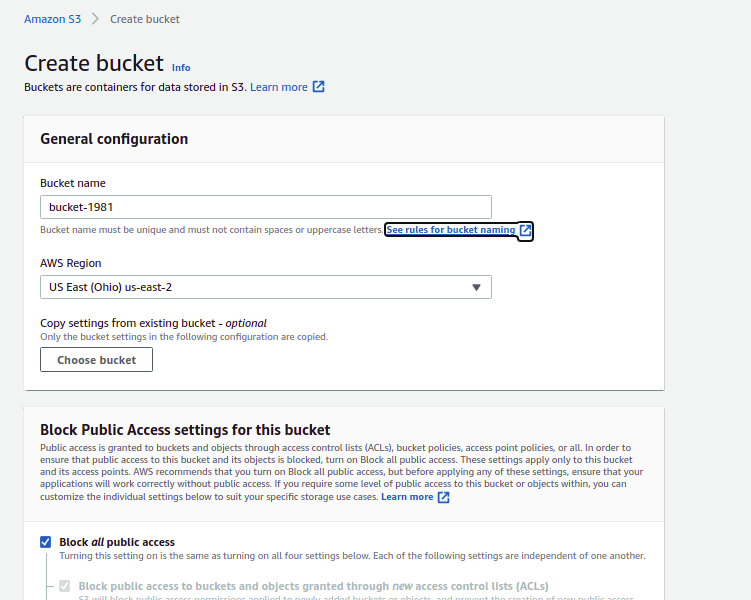
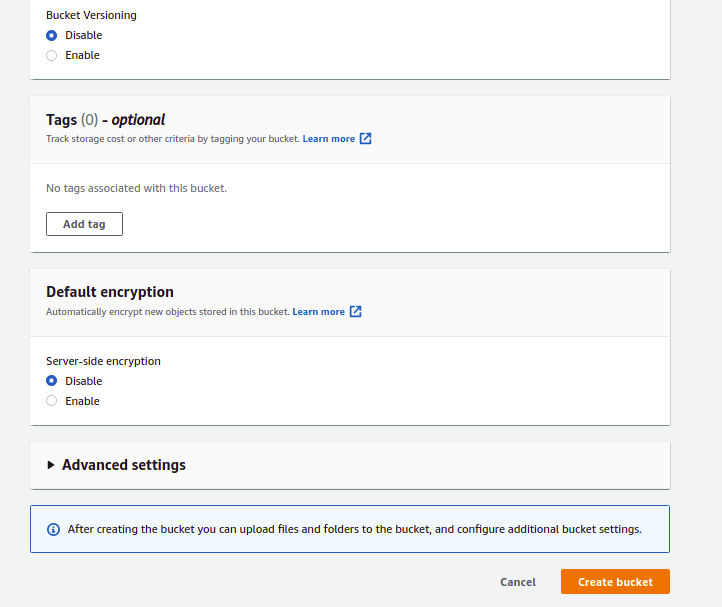
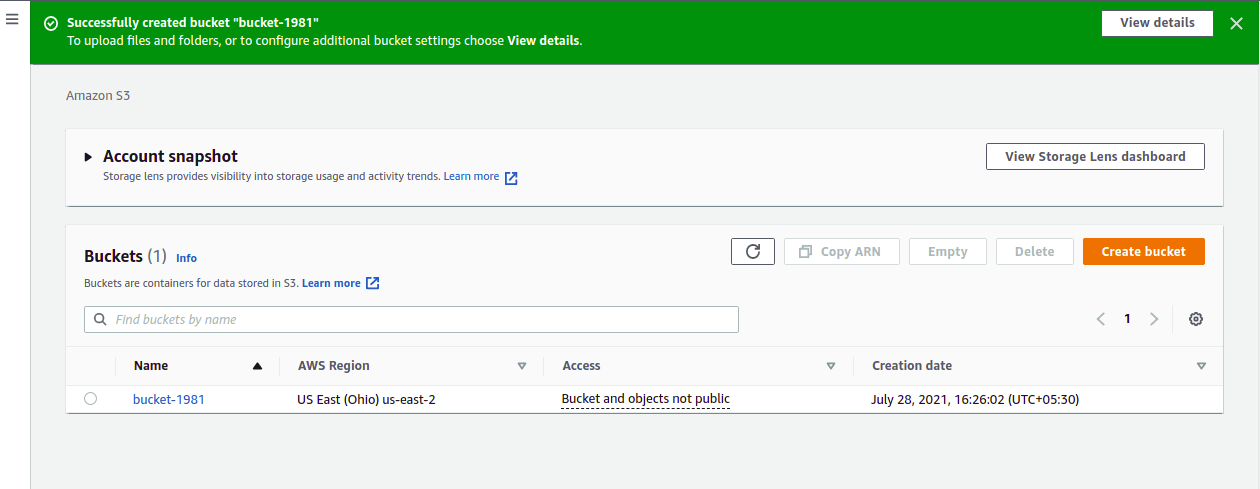
5. Provide your bucket name, select your AWS region, and click on the Create bucket button. Once the bucket has been created successfully, you should see the next screen:
Create an IAM Role for SFTP Users
Next, you will need to create an IAM role for SFTP users with an updated trust relationship.
Follow the below steps to create an IAM role:
1. Search for IAM in the search bar. You should see the following screen:
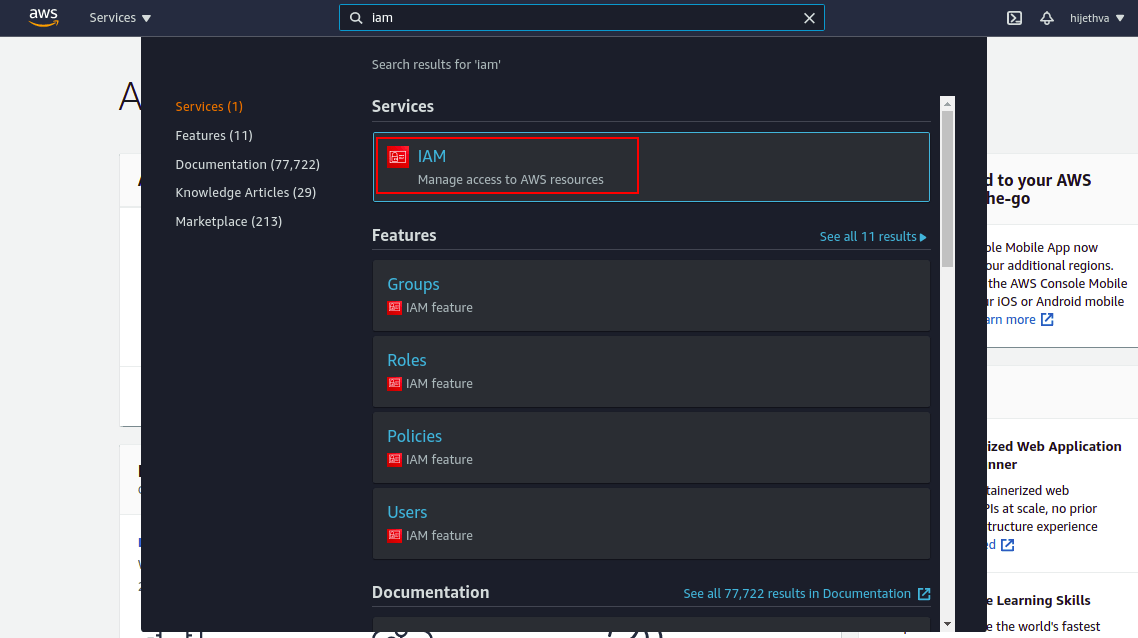
2. Click on IAM. You should see the following screen:

3. Click on the Create role button. You should see the following screen:
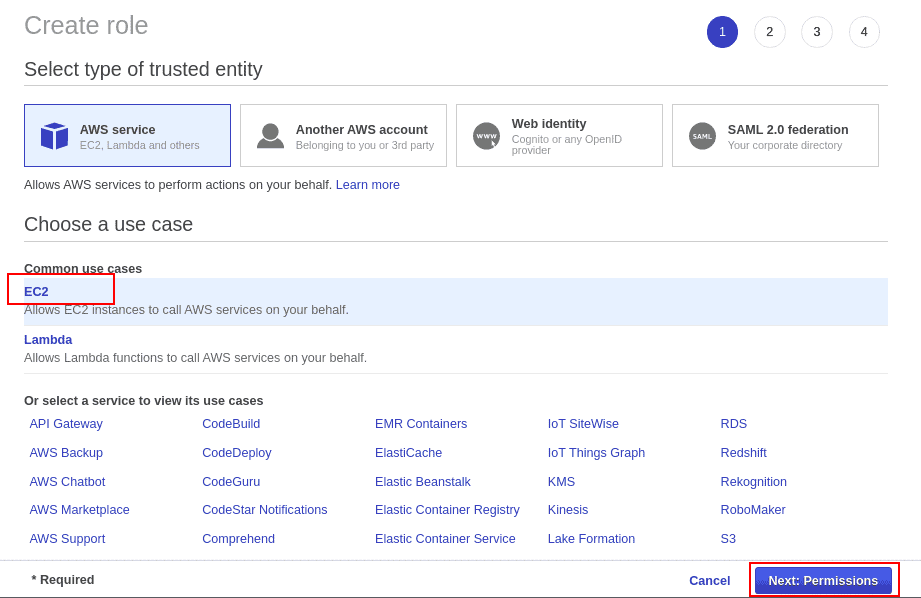
4. Select EC2 and click on the Next: Permissions. You should see the following screen:
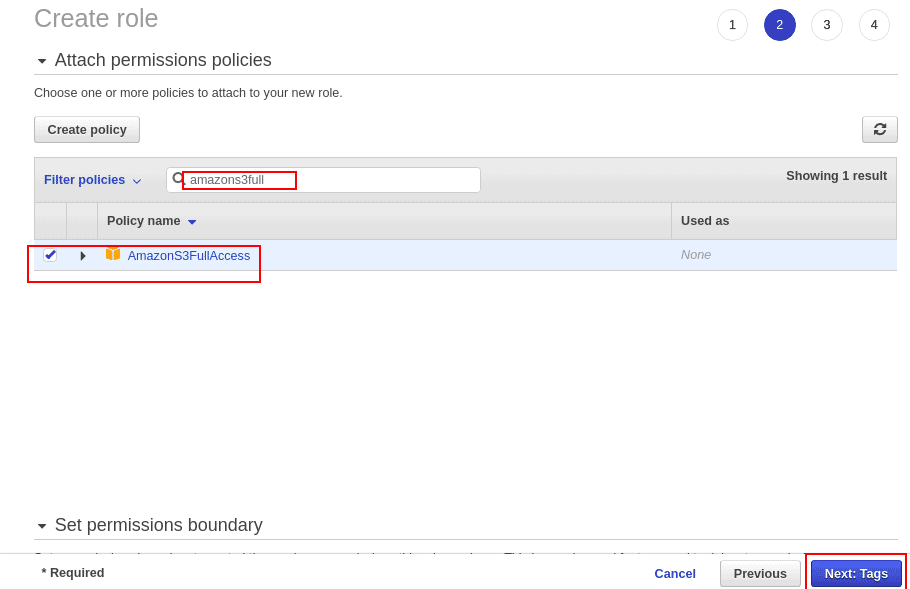
5. Search for AmazonS3FullAccess in the Filter policies search box, select AmazonS3FullAccess policy and click on the Next: Tags button. You should see the following screen:
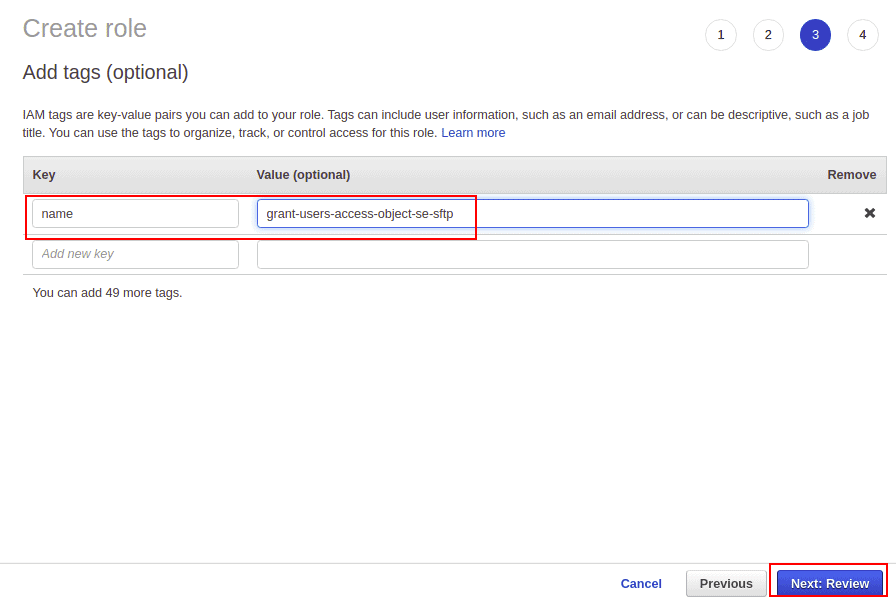
6. Provide the name and value of your Tag and click on the Next: Review button. You should see the following screen:
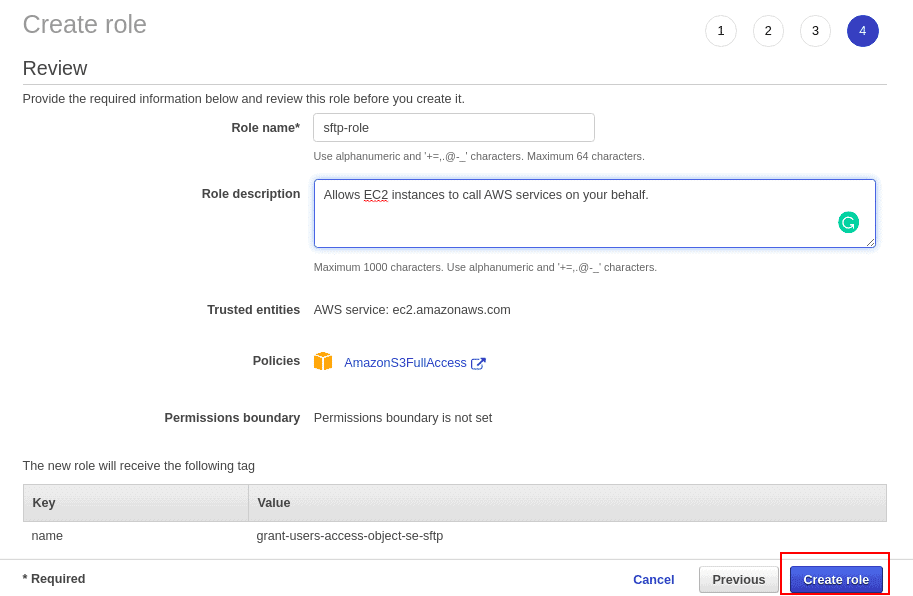
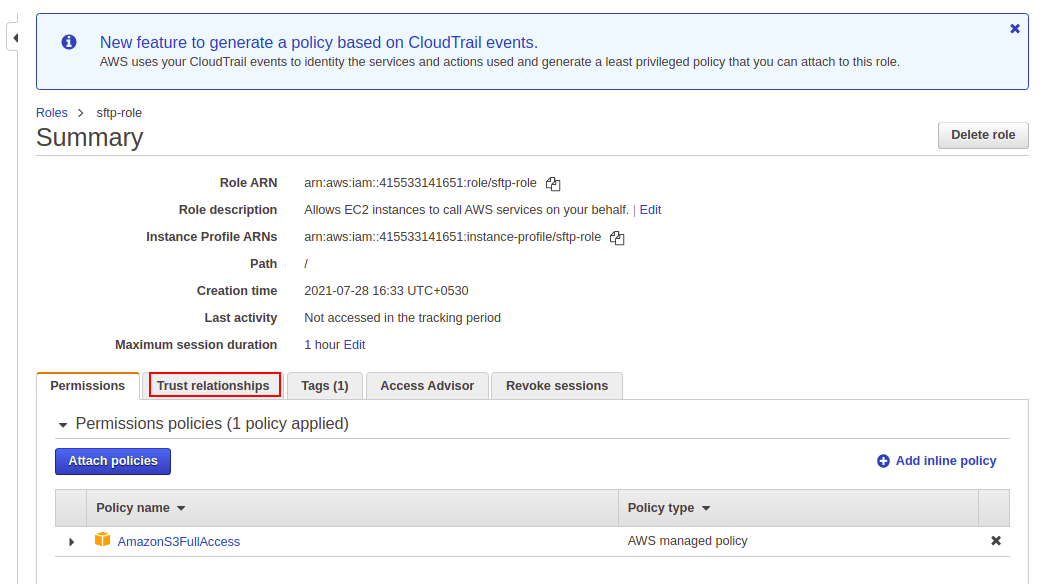
7. Provide your Role name, description, and click on the Create role button. Once the Role has been created successfully, you should see the following screen:
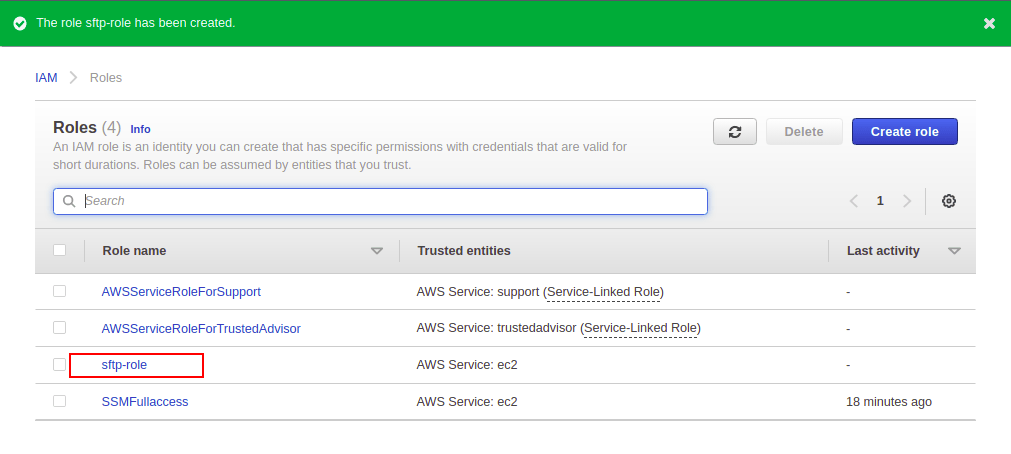
8. Next, click on your roles. You should see the following screen:
9. Click on the Trust relationships tab. You should see the following screen:
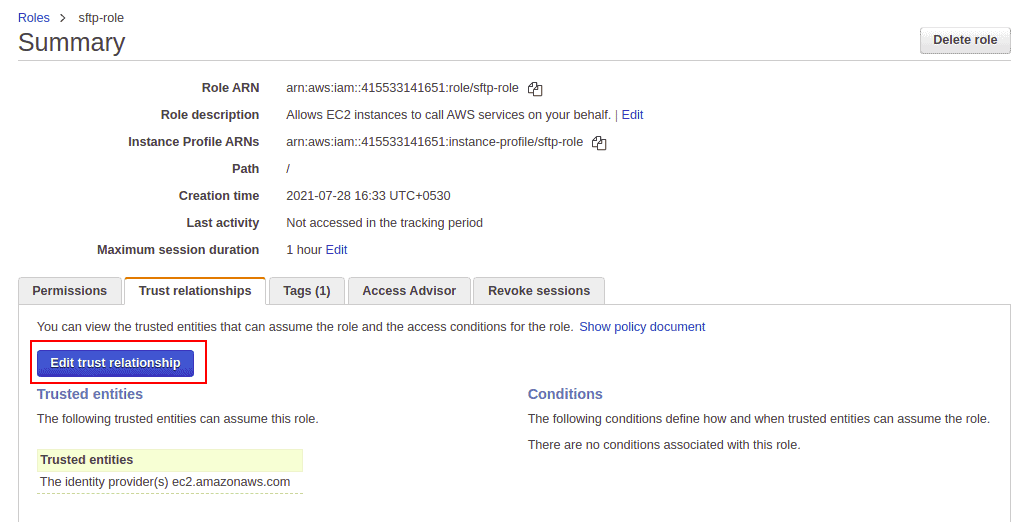
10. Click on Edit trust relationship. You should see the following screen:

11. Replace the line ec2.amazonaws.com with transfer.amazonaws.com for sftp service to work. Then, click on the Update Trust Policy button on the corner right side.
Create SFTP Server on Amazon AWS
Next, you will need to create an SFTP server on AWS using the AWS Transfer Family service.
Follow the below steps to create an SFTP server.
1. Search for SFTP on the search bar. You should see the following screen:

2. Click on AWS Transfer Family. You should see the AWS Transfer Family dashboard:

3. Click on the Create server button. You will be asked to choose the protocols as shown below:
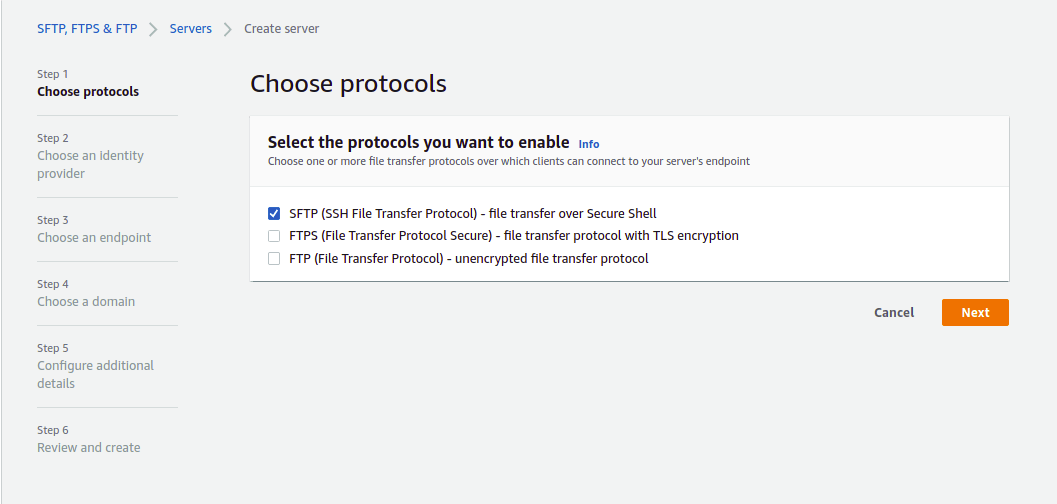
4. Select SFTP protocol and click on the Next button. You will be asked to select an identity provider as shown below:
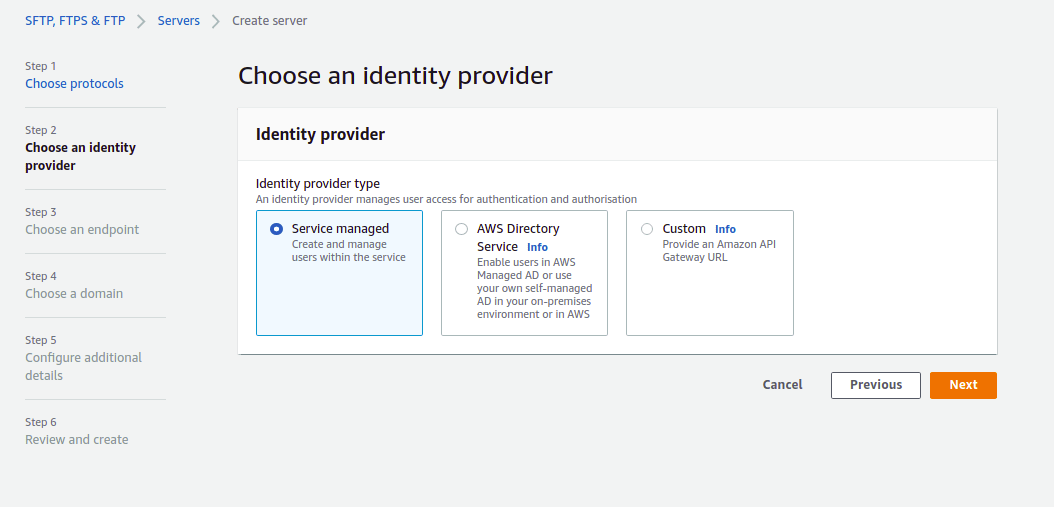
5. Select Service Manage and click on the Next button. You will be asked to select an endpoint as shown below:
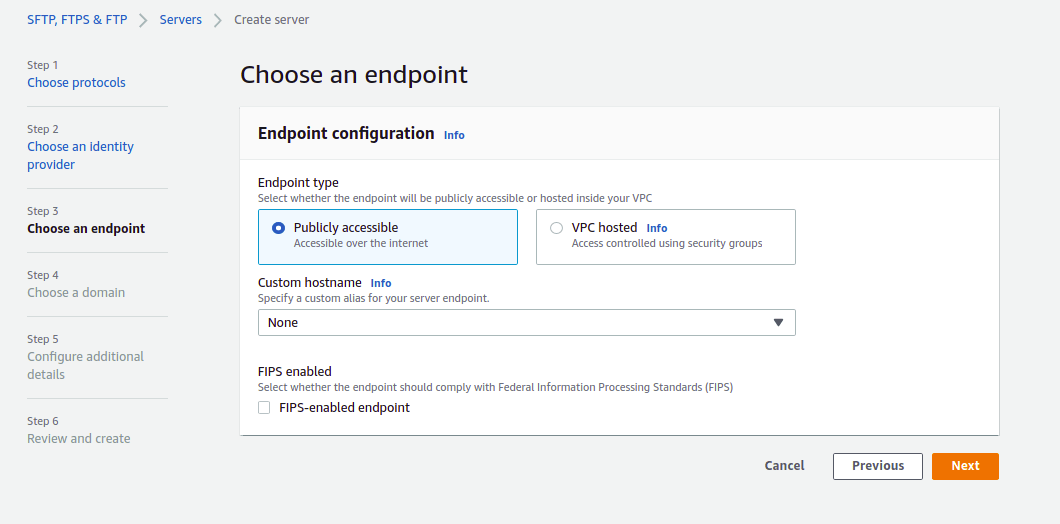
6. Select endpoint type, hostname, and click on the Next button. You will be asked to choose a domain as shown below:
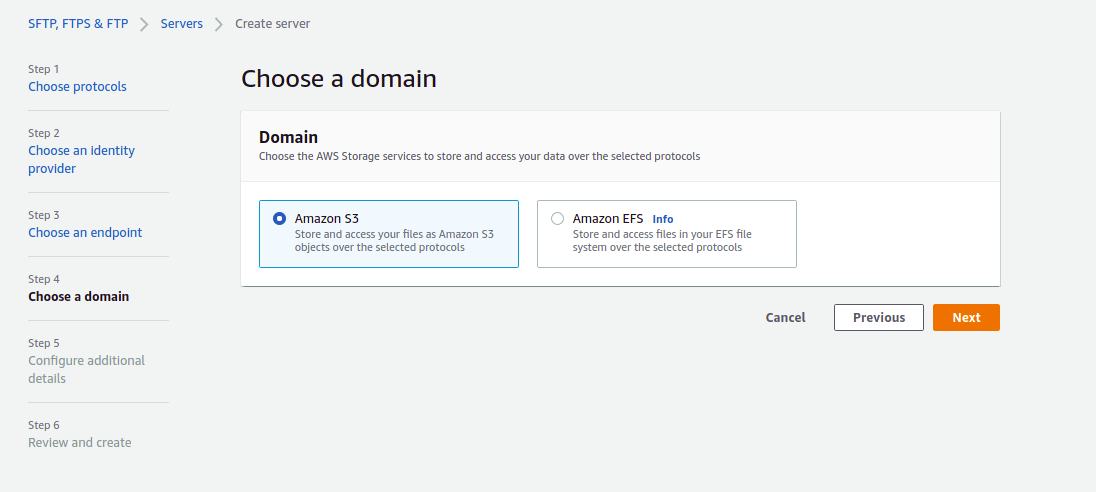
7. Select Amazon S3 and click on the Next button. You will be asked to configure additional details as shown below:
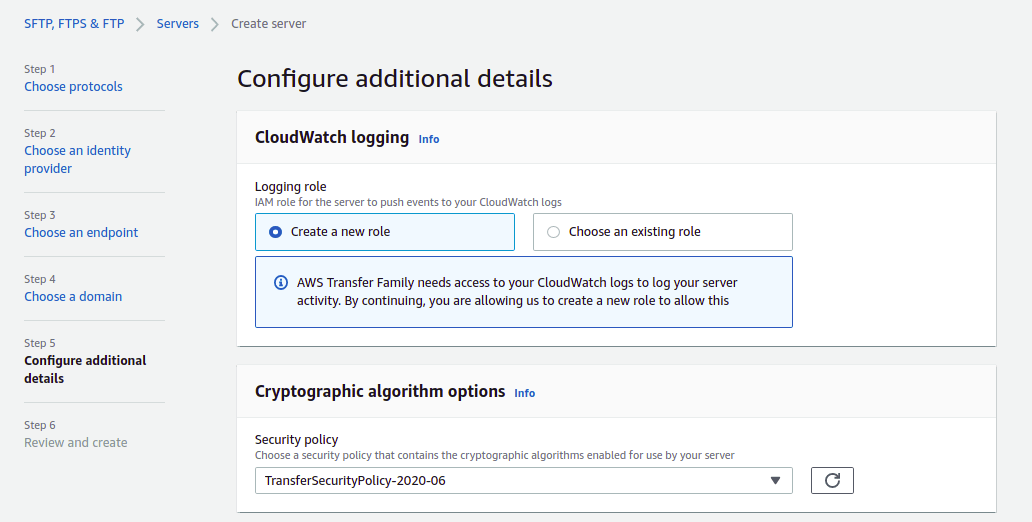
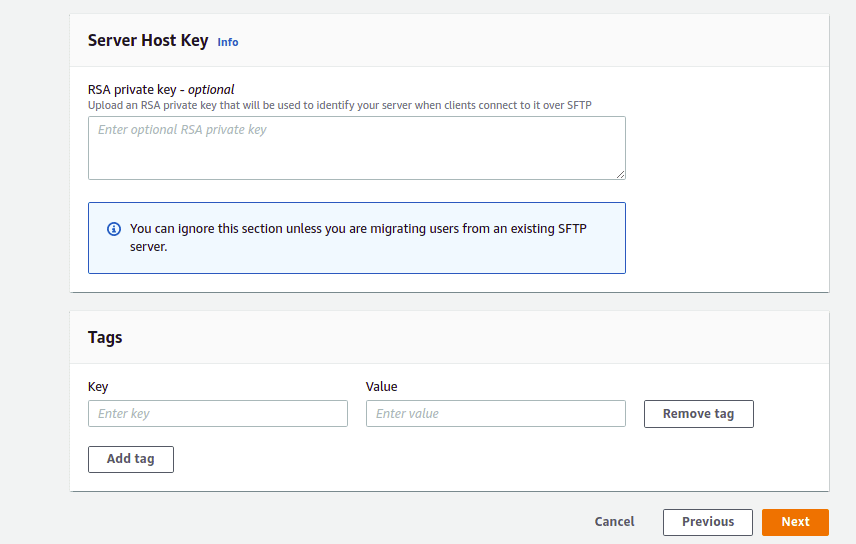
8. Provide relevant details and click on the Next button. You should see the following screen:
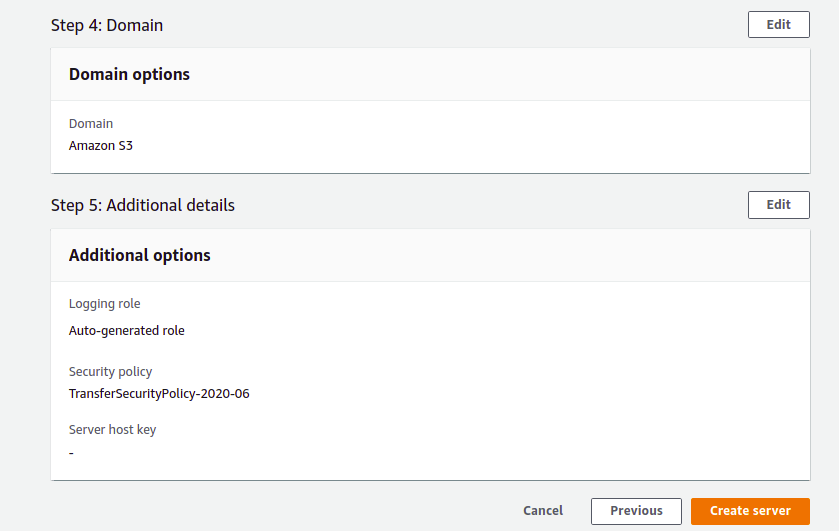
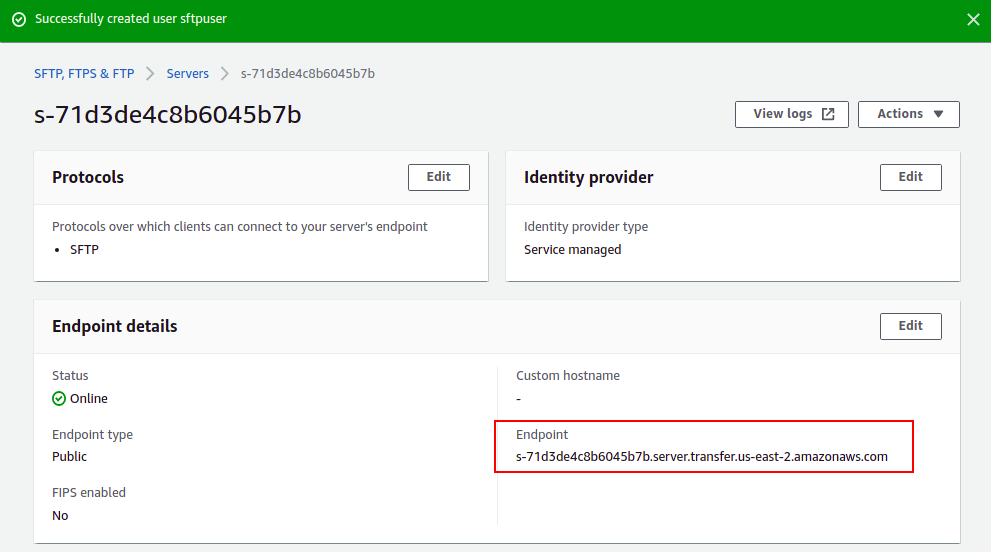
9. Review all the settings and click on the Create server button. Once the SFTP server has been created successfully, you should see the following screen:
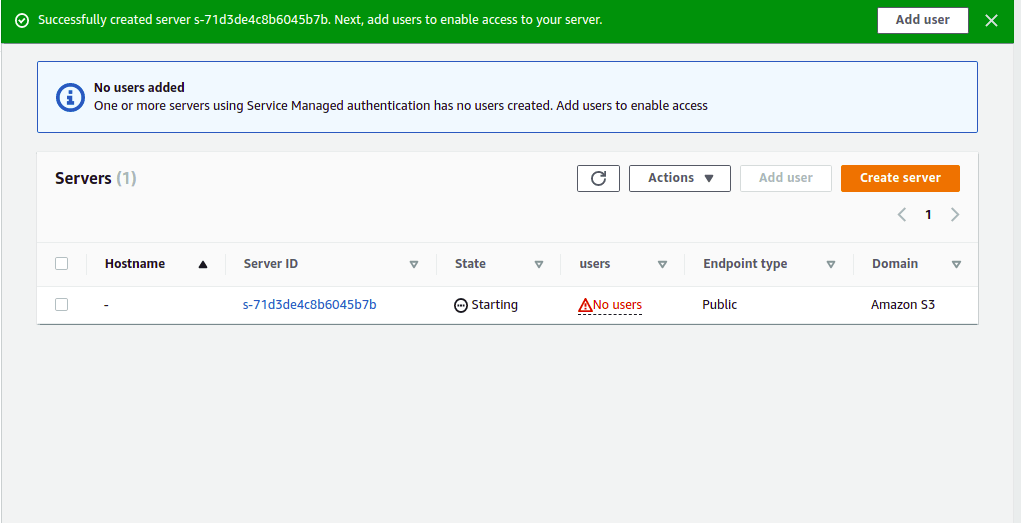
10. As you can notice, there are no users created yet, so click on the button Add User for creating users who will be accessing this sftp service. Next, click on your SFTP server. You should see the following screen:
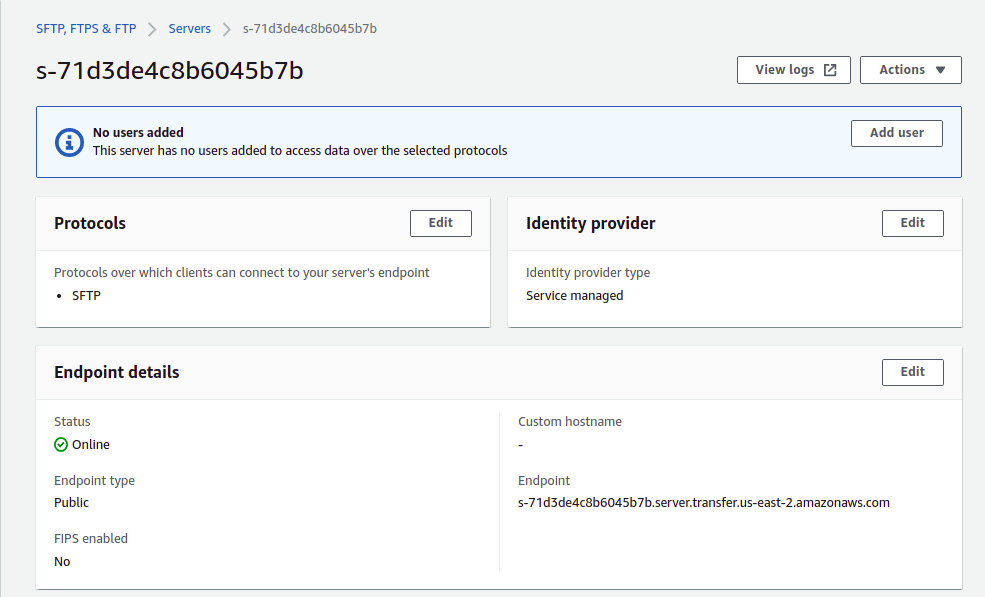
11. Now, click on the Add user button. You should see the user configuration page:
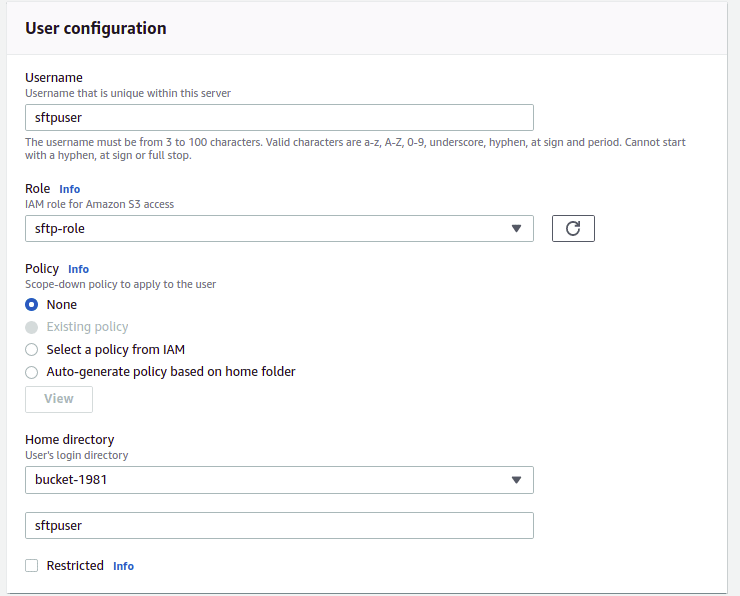

12. Here, provide your desired SFTP username, select the SFTP role we have created earlier, and select the S3 bucket we created earlier. You will also need to provide an SSH public key of the remote machine from where you want to access the SFTP server.
To generate an SSH key on the remote machine, run the following command:
ssh-keygen -P "" -f "sftp-key"
You should see the following output:
Generating public/private rsa key pair.
Your identification has been saved in sftp-key.
Your public key has been saved in sftp-key.pub.
The key fingerprint is:
c6:e0:7b:73:5c:1d:4e:e7:3b:ab:6d:69:f1:c9:91:91 vyom@newpc
The key's randomart image is:
+--[ RSA 2048]----+
| |
| |
| . o o|
| . o + E |
| . S . o +|
| o . . +.|
| . o o .o*|
| . o .*+|
| .+o |
+-----------------+
You can see the generated keys using the following command:
ls -l sftp*
You should see the following output:
-rw------- 1 vyom vyom 1675 Jul 28 16:53 sftp-key
-rw-r--r-- 1 vyom vyom 392 Jul 28 16:53 sftp-key.pub
Now, print the content of the sftp-key.pub public key:
cat sftp-key.pub
You should see the following output:
ssh-rsa AAAAB3NzaC1yc2EAAAADAQABAAABAQDXeyyWpl5yXA1Zadz3x1Kb6J9XCQXr5d0nLUmOpOhhzdAjlbC3ykx93qu9i0cz3PV07XgcNaJpHm65VdB3nCxrMxYS91qeHm32Cnt3GI4o8TGHyjFBycOh8lo8lVF2OYPelOufEOXW1nZTDpGEW5MOOLM078LcoECskLWTOXyjopGhKqiHu/04cIvjo5YDHUbjoRhEryzDaSWnHe3KCz9q4TtQAAOU3Jc5iZeZH6o7CE3uUlGAppBd6gdvmBnccFBQC36+zmskbYciLDH398XYpg3r9fL4fdJlgjjhCg62m+rMCNtJDApLJdbIN477JloVr4iZcc3ysM16Dl3qTZIJ
Now, copy the above key and paste it into the SFTP server dashboard. Then, click on the Add button. Once the user has been added successfully, you should see the following screen:
Access SFTP server from Linux
At this point, the SFTP server has been installed and configured on Amazon AWS. Now, we will access the SFTP server from the remote Linux machine.
Log in to the remote Linux machine, open the command-line terminal and access the SFTP server using the following command:
sftp -i sftp-key sftpuser@s-71d3de4c8b6045b7b.server.transfer.us-east-2.amazonaws.com
Where:
- sftp: It is a command used to connect remote SFTP server.
- -i sftp-key: A private key is used to connect to an SFTP server without a password.
- sftpuser: It is the name of the SFTP username.
- s-71d3de4c8b6045b7b.server.transfer.us-east-2.amazonaws.com: It is the full URL of your SFTP server.
Once you are connected to the SFTP server, you should see the following output:
The authenticity of host 's-71d3de4c8b6045b7b.server.transfer.us-east-2.amazonaws.com (3.129.55.151)' can't be established.
RSA key fingerprint is ae:2e:cc:31:92:c9:a1:fe:d8:83:c0:08:2e:6b:49:fe.
Are you sure you want to continue connecting (yes/no)? yes
Warning: Permanently added 's-71d3de4c8b6045b7b.server.transfer.us-east-2.amazonaws.com,3.129.55.151' (RSA) to the list of known hosts.
Connected to s-71d3de4c8b6045b7b.server.transfer.us-east-2.amazonaws.com.
sftp>
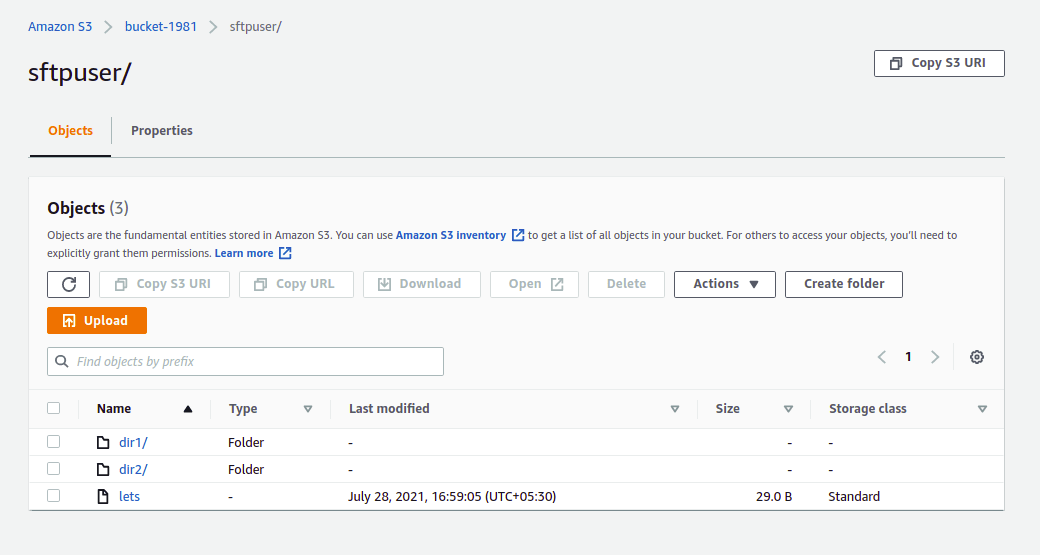
Now, create some directories on the SFTP server using the following commands:
sftp> mkdir dir1
sftp> mkdir dir2
Now, upload a file named lets from the local system to the SFTP server:
sftp> put lets
You should see the following output:
Uploading lets to /bucket-1981/sftpuser/lets
lets 100% 29 0.0KB/s 00:00
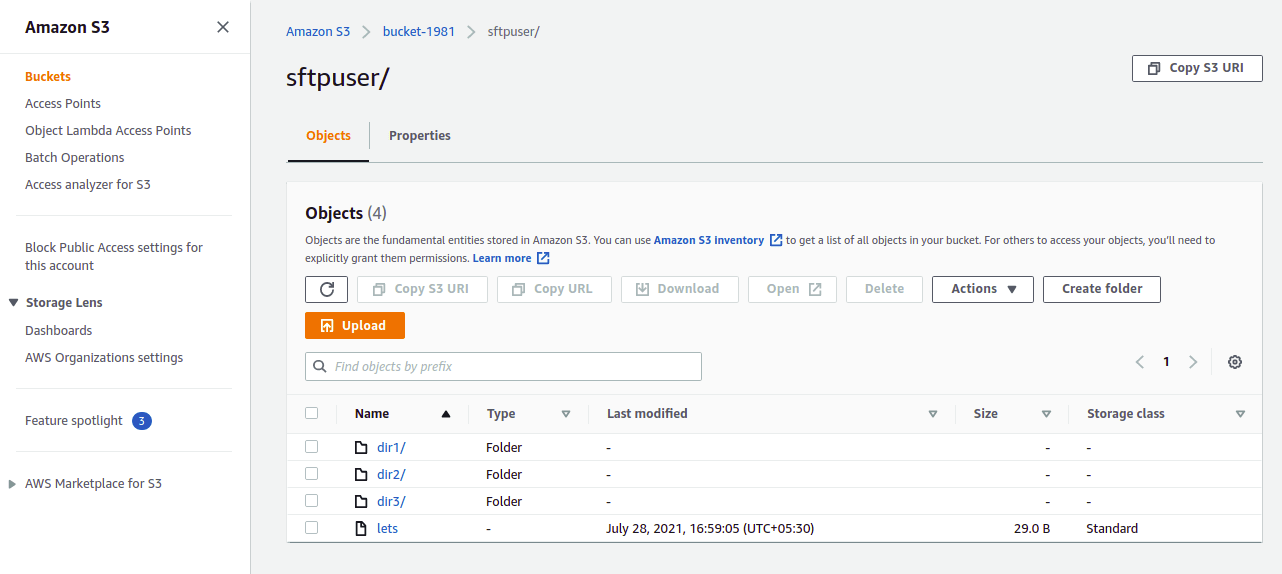
Now, login to the AWS console and go to the S3 bucket. You should see the following screen:
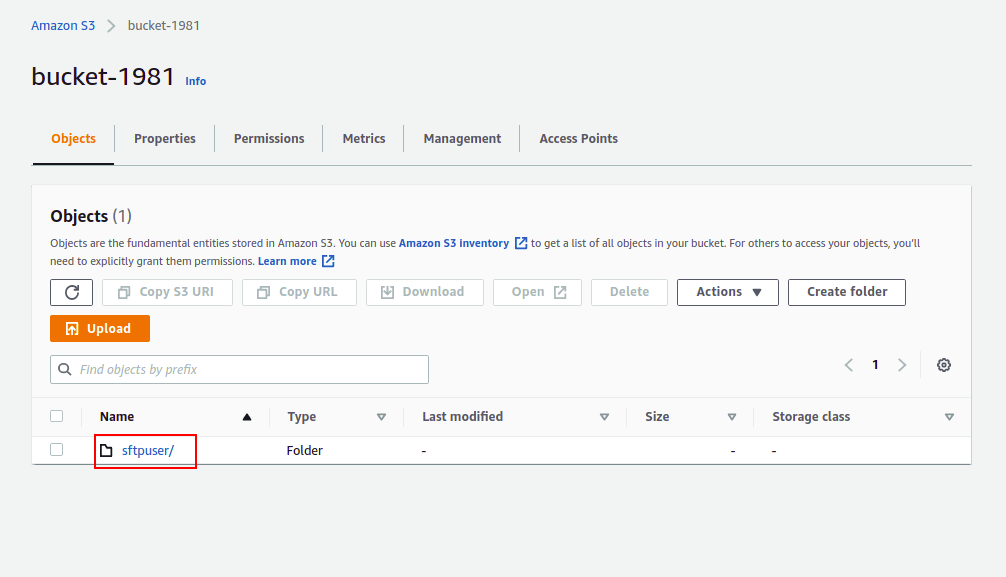
Click on the sftpuser home directory. You should see your file and guides on the following screen:
Integrate Files.com with Amazon SFTP Server.
This section will show you how to connect the Amazon S3 bucket from Files.com and mount the S3 bucket to Files.com.
Follow the below steps to integrate Files.com with the Amazon SFTP server:
1. log in to Files.com and click on Integrations. You should see the following screen:
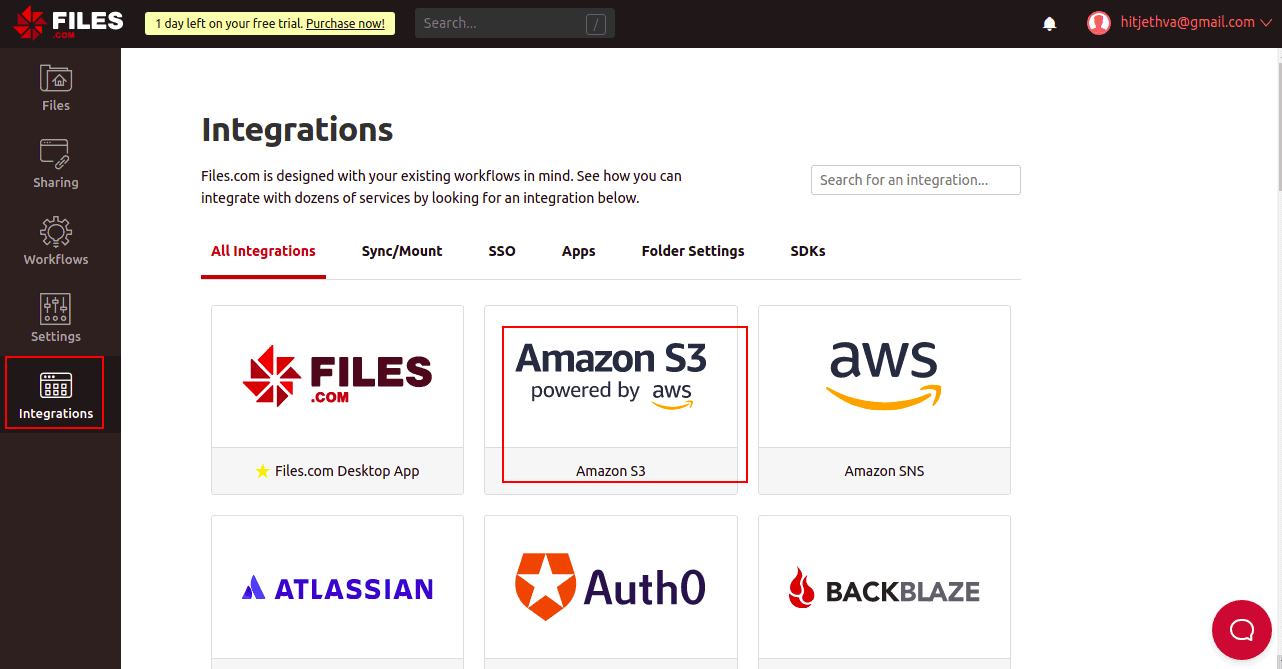
2. Click on the Amazon S3. You should see the following screen:
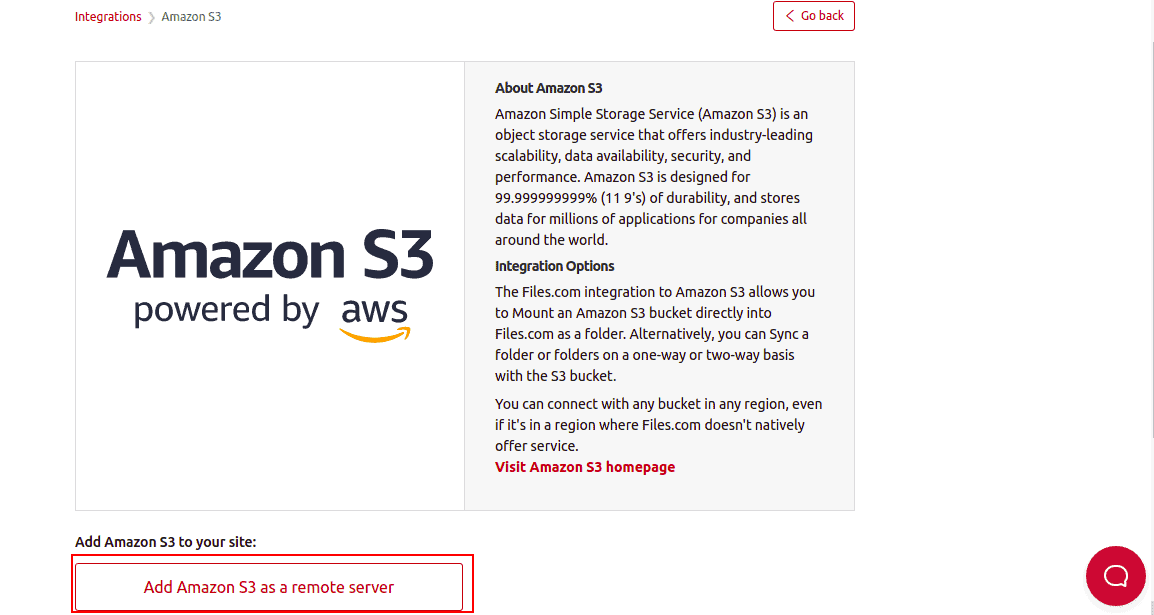
3. Click on Add Amazon S3 as a remote server. You will be asked to provide your Amazon S3 credentials as shown below:
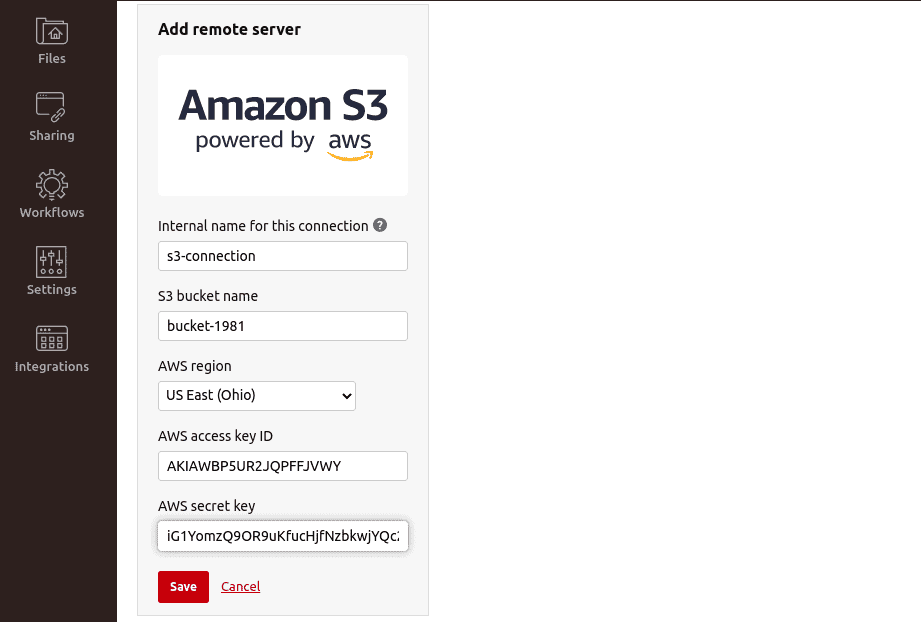
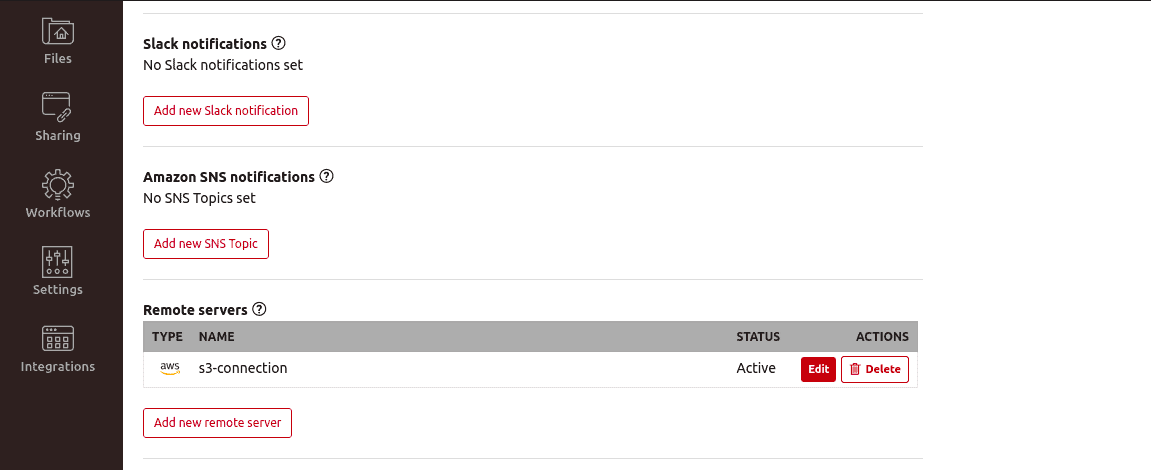
4. Provide a connection name, S3 bucket name, AWS region, AWS access key, AWS secret key and click on the Save button. Once you are connected to AWS S3 successfully, you should see the following screen:
5. Next, click on the Files on the Files.com dashboard. You should see the following screen:

6. Click on the New folder to create a new directory on Files.com. You will be asked to provide the name of the folder as shown below:

7. Provide a folder name and click on the Create button.
8. Next, navigate to your newly created folder and click on the Folder settings. You should see the following screen:
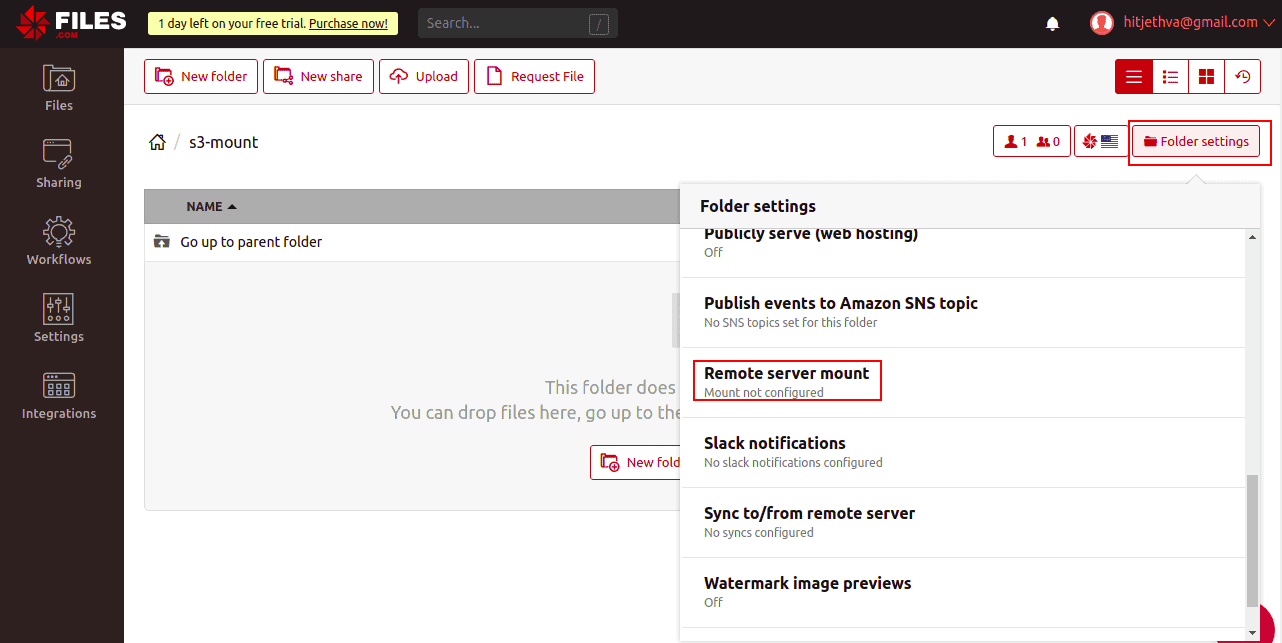
9. Next, click on the Remote server mount. You should see the following screen:
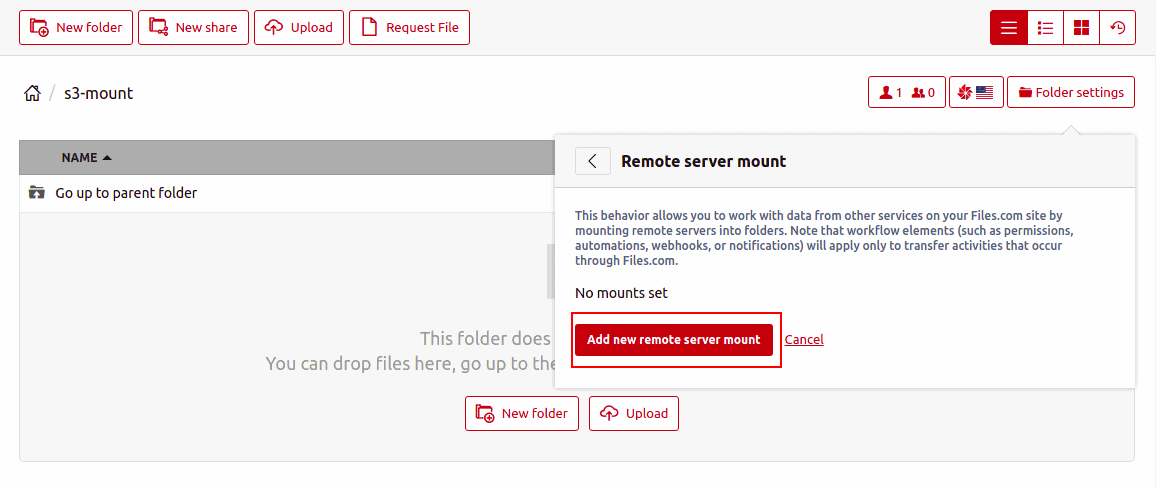
10. Click on Add new remote server mount. You should see the following screen:
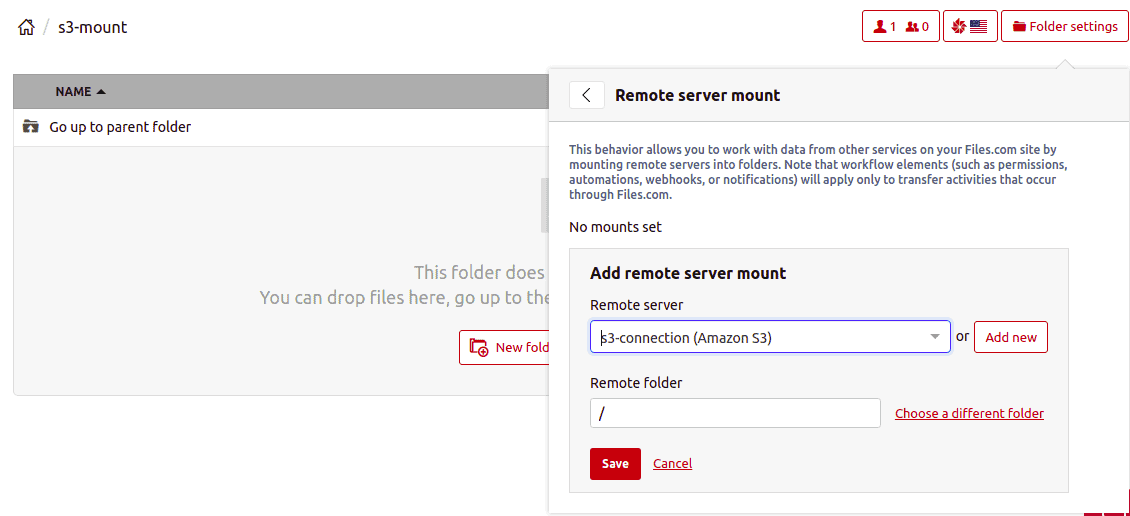
11. Select your AWS S3 server, remote folder path, and click on the Save button. Once you are connected, you should see the following screen:
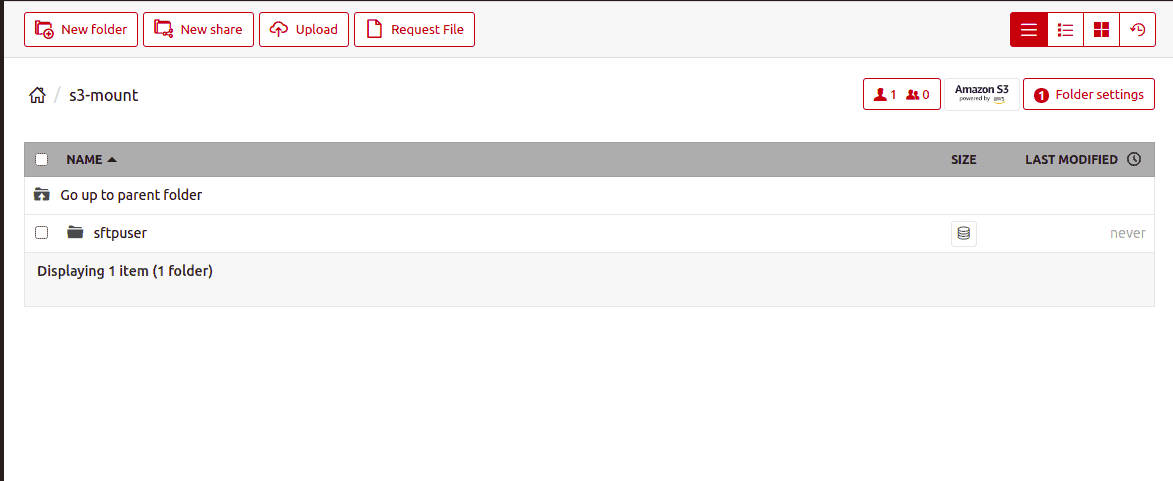
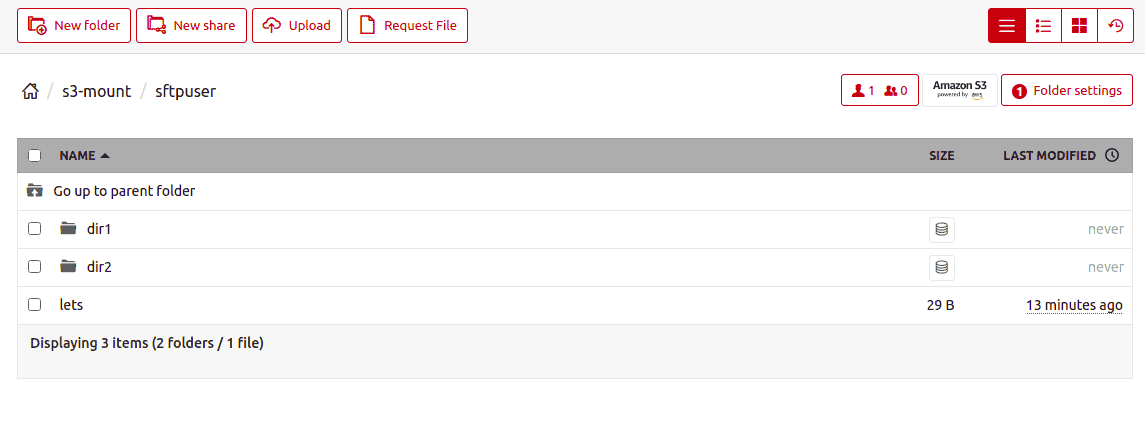
12. Now, click on sftpuser. You should see that all directories and files are mounted on Files.com:
13. Now, click on the New folder to create a new folder on the mount point. You should see the following screen:
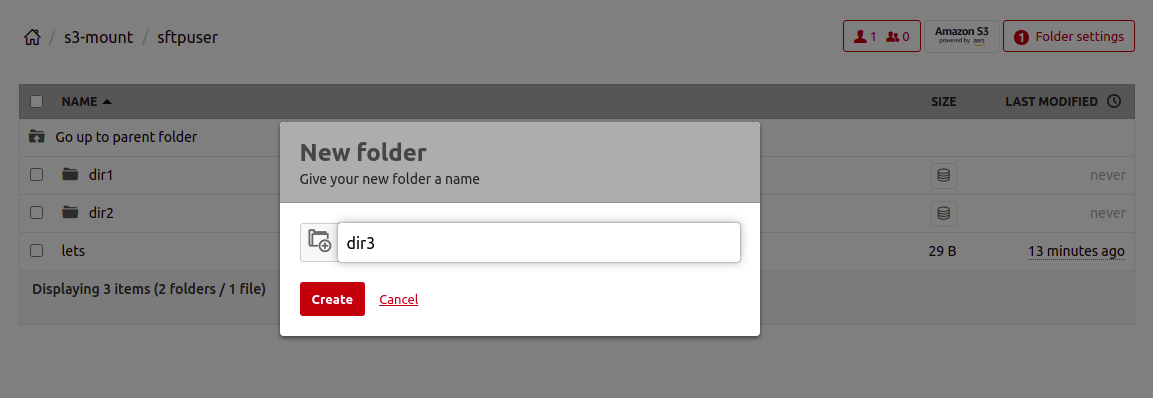
14. Provide your folder name and click on the Create button. You should see the following screen:
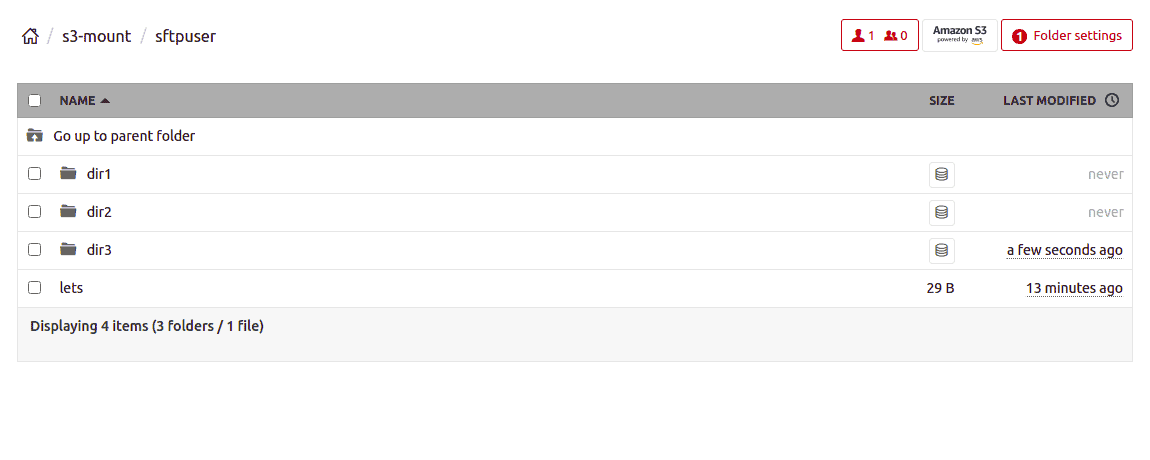
15. Now, go back to your AWS S3 bucket. You should also see your newly created folder there.
Set up Cerberus FTP Server on AWS EC2
Log into your AWS account as root user to install Cerberus FTP Server.
Create a new virtual server
Your first task is to set up a virtual server on which to host the Cerberus FTP Server software.
- In the AWS Management Console look in the AWS services for All services. In the Compute list, find EC2 and click on it.
- In the EC2 Dashboard, click on the Launch Instance button. This is where you will create a new virtual server.
- The first step requires you to choose an Amazon Machine Image – this provides the operating system for your virtual server. Select the most recent Windows Server Base option.
- The next screen requires you to choose and instance type. You will need at least 2 vCPUs and 4 GiB of RAM. However, if you will be implementing a large volume of transfers, you should select a larger size. It is possible to change the instance type later, so don’t stress too much about getting the size right at this point.
- Click Next: Configure Instance Details to move on to the next step.
- Leave the defaults in the Configure Instance Details screen. Press the Next: Add Storage button to proceed.
- Choose an amount of storage. The Cerberus software needs less than 500 MB. However, you could add on space for temporary file storage. Click on Next: Add Tags.
- You don’t need to do anything in the Add Tags screen. Click on Next: Configure Security Group.
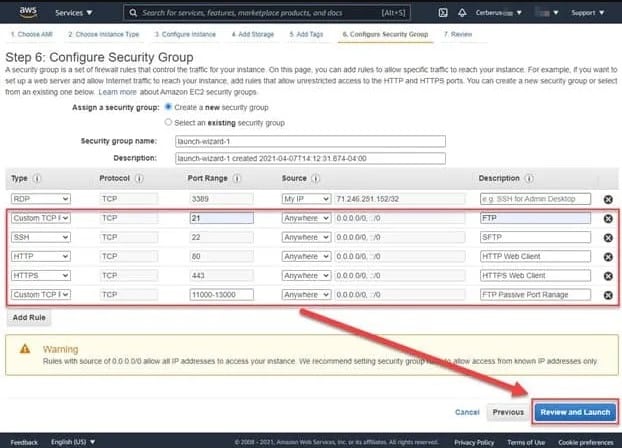
- Add lines in the Configure Security Group screen for each of the protocols that you are going to use. See the image below for details. This is the last input screen. Press the Review and Launch button.
- Check all of the settings shown in the Review Instance Launch screen and press the Launch button.
- Click on Network & Security in the left-hand menu panel and then select Elastic IPs. Choose Allocate and Elastic IP address. In the Public IPv4 address pool picklist, choose Amazon's pool of IPv4 addresses. Click on the Allocate button. This will give you a static IP address to use when setting up clients and other integration features.
- Click on Elastic IPs in the navigation panel again but this time you will be able to see the newly assigned IP address. Select it and then click on the Actions dropdown list at the top of the panel and click on Associate Elastic IP address in that list.
- Select Instance for the Resource type and pick your new instance from the list of available instances. Click on Associate.
Create a key pair
SSH requires a key pair that operates public key encryption. This system has a public key for encryption and a private key for decryption. The most widely-used method for public key encryption is called RSA and a key generation service for this algorithm is available in AWS.
- Go back to the Network & Security section in the left-hand navigation panel and click on Key Pairs. Press the Create key pair button at the top of the main panel.
- In the Create key pair panel, enter a value in the Name field – use CerberusFTPServer, choose pem for File format, and then press the Create key pair button.
- You will be prompted for a local drive for download. Select a directory. The key pair will be saved on your hard drive as the file CerberusFTPServer.pem.
Connect to an AWS instance with RDP
You can access the new AWS instance from your Windows workstation or a Windows Server machine. Windows already has Remote Desktop installed.
- Go to the EC2 dashboard.
- Select your new instance for the Instances in the left panel.
- Ensure that the instance record in the main panel is selected and then press the Connect button at the top of the screen.
- In the Connect to Instance info panel, activate the RDP client tab and click on Get password.
- In the Get password info screen, click on the Browse button to locate the CerberusFTPServer.pem file that you stored locally. Press the Decrypt Password button.
- Back in the Connect to instance panel’s RDP client tab. Click on the Download remote desktop file button.
- Wait for the file to download and then double-click on it to open it.
- You will see a Remote Desktop warning. This tells you that the source of the remote computer is unknown. Check the box for Don’t ask me again for connections to this computer and press the Connect button.
- You will be prompted for a password. Go back to the Connect to Instance screen in AWS and copy the password shown at the bottom of the panel by clicking on the symbol in front of the password. Click in the password field and press Control-V to paste the saved password.
- You will see a Remote Desktop Connection message that says the security certificate cannot be verified. Check the box for Don’t ask me again for connections to this computer and dismiss this message by clicking on the Yes button.
RDP will now open a window that gets you inside your new instance.
Install the Cerberus FTP Server software
If you have exited from your Remote Desktop session into your EC2 instance, get back into it by following these instructions.
- From within your remote session, open a Web browser and go to the Cerberus FTP Server site at https://www.cerberusftp.com/lp/comparitech-best-ftp-server/. This page offers a 25-day free trial.
- Fill in the form by entering your name and email address and click on the Get My Download button.
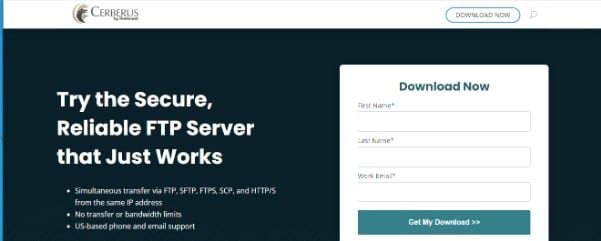
- An installer file will download.
- Right-click on the downloaded CerberusInstall64.exe and click on Run as administrator in the popup menu.
- You will see a warning popup that says Unidentified program wants to access your computer. Press the Yes button. The Cerberus FTP Server Installation Wizard will open.
- In the Welcome to the Cerberus FTP Server Setup screen, click Next.
- You will see the service credentials configuration screen
.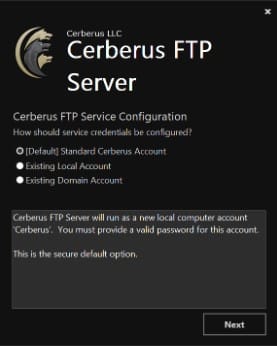
The options are:-
- Standard Cerberus Account
This is the default. It creates a new, unprivileged account called Cerberus on the local computer. You will be prompted to create a password in the next screen. - Existing Local Account
This option lets you use an existing account on the local computer for Cerberus services. You will need to enter the username and password in the next screen. - Existing Domain Account
With this option, you can use a Windows Domain account. You will enter the credentials in the next screen.
- Standard Cerberus Account
Press the Next button.
-
- The requirements of the next screen are dependent on the option you selected for service configuration. Enter the appropriate credentials. Click Validate. Once validation passes, click Next.
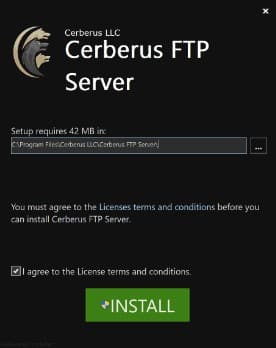
- In the next screen, select an installation folder or keep the default path. Check the I agree to the License terms and conditions box and press the Install button.
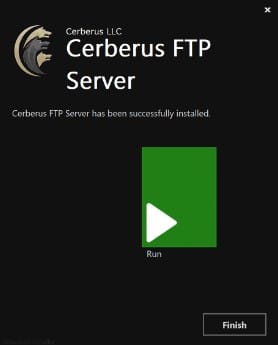
- Wait until the installation is completed.
- Click Finish or press the Run button to end the installation and start Cerberus FTP Server.
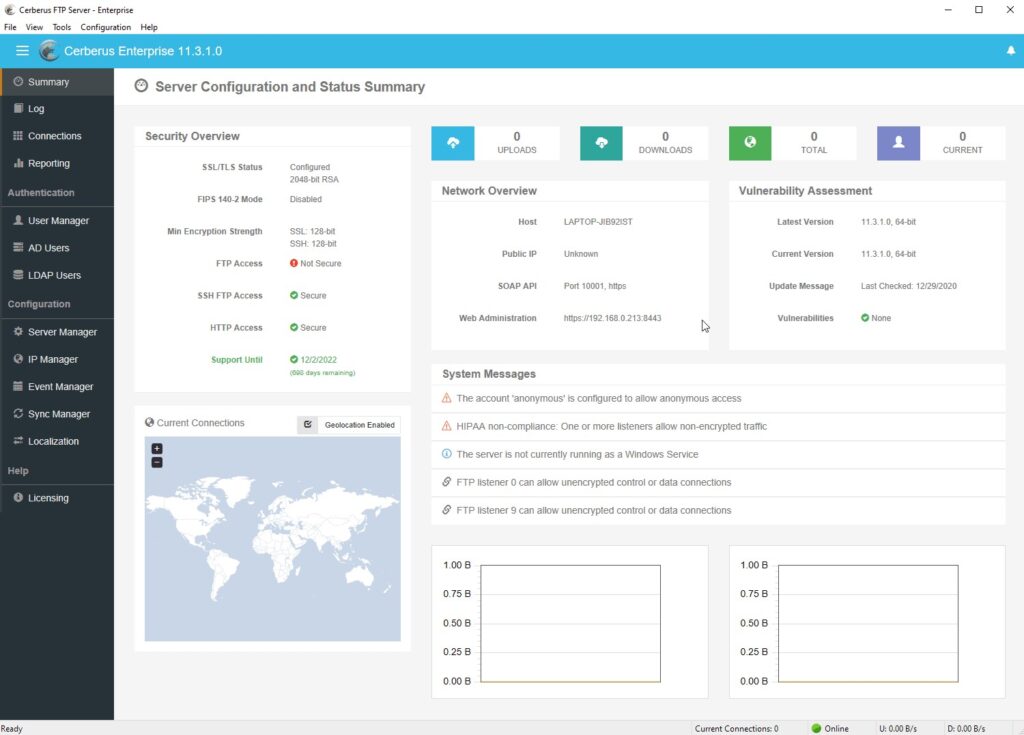
You can now run the Cerberus FTP Server and set up its SFTP service.
Conclusion
In the above guide, you learned how to create an SFTP server on Amazon S3 and integrate it with Files.com. I would recommend Files.com for secure storage and transfer of your files, especially huge ones. Files.com offers a 7-day free trial of their services.
FTP/SFTP Access to an Amazon S3 Bucket FAQs
What is FTP/SFTP?
FTP/SFTP, or File Transfer Protocol/Secure File Transfer Protocol, is a standard protocol used for transferring files over the Internet.
What are some popular tools for accessing Amazon S3 with FTP/SFTP?
Some popular tools for accessing Amazon S3 with FTP/SFTP include:
- Files.com
- Transmit
- ExpanDrive
- S3 Browser
How do I connect to an Amazon S3 bucket using FTP/SFTP?
To connect to an Amazon S3 bucket using FTP/SFTP, follow these steps:
- Install and configure the FTP/SFTP tool you want to use.
- Enter the access credentials for your Amazon S3 bucket, including the access key ID, secret access key, and bucket name.
- Set the appropriate permissions for the tool to access your Amazon S3 bucket.
- Verify the connection settings and establish the FTP/SFTP connection.
- Use the FTP/SFTP tool to transfer files to and from your Amazon S3 bucket.
How can I troubleshoot issues with accessing an Amazon S3 bucket using FTP/SFTP?
To troubleshoot issues with accessing an Amazon S3 bucket using FTP/SFTP, you can try the following:
- Check the connection settings to make sure they are correct.
- Verify that you have the necessary permissions and access to the Amazon S3 bucket.
- Check for connectivity issues, such as network or firewall settings that may be blocking the connection.
- Try restarting the FTP/SFTP tool or rebooting the client machine to see if the issue is resolved.
How do I generate an access key ID and secret access key for an Amazon S3 bucket?
To generate an access key ID and secret access key for an Amazon S3 bucket, follow these steps:
- Log in to the AWS Management Console.
- Navigate to the Amazon S3 service.
- Click on the bucket you want to access.
- Click on the "Permissions" tab.
- Click on the "Access control list" button.
- Click on the "Create Access Key" button.
- Copy the access key ID and secret access key and use them to authenticate access to the bucket.


